> 착한 말로 감자 키우기 (w/ Hugging Face Inference API)
Crescent
Table of Contents
다음은 2024년 2월에 진행한 AxT CC (Crash Course) 단기 교육:'누구나 할 수 있는 API 활용 백서 : Open API & ChatGPT편'에서 진행한 실습 내용입니다.
☀️ 전체 코드
🌱 소개

- 문장을 입력을 받는다. (HTML)
- Hugging Face Inference API를 활용, 이 문장이 긍정인지 부정인지 판단한다. (JavaScript)
- 결과를 HTML에 표시한다. (JavaScript)
- 긍정이면 잎이 자라고 배경이 초록색으로 바뀐다. 그리고 부정이면 잎이 줄어들고 배경이 분홍색으로 바뀐다. (p5.js)
1. 필요한 것
- Hugging Face Inference API Key (Access Token)
2. 오늘의 Hugging Face AI 모델: [matthewburke/korean_sentiment]
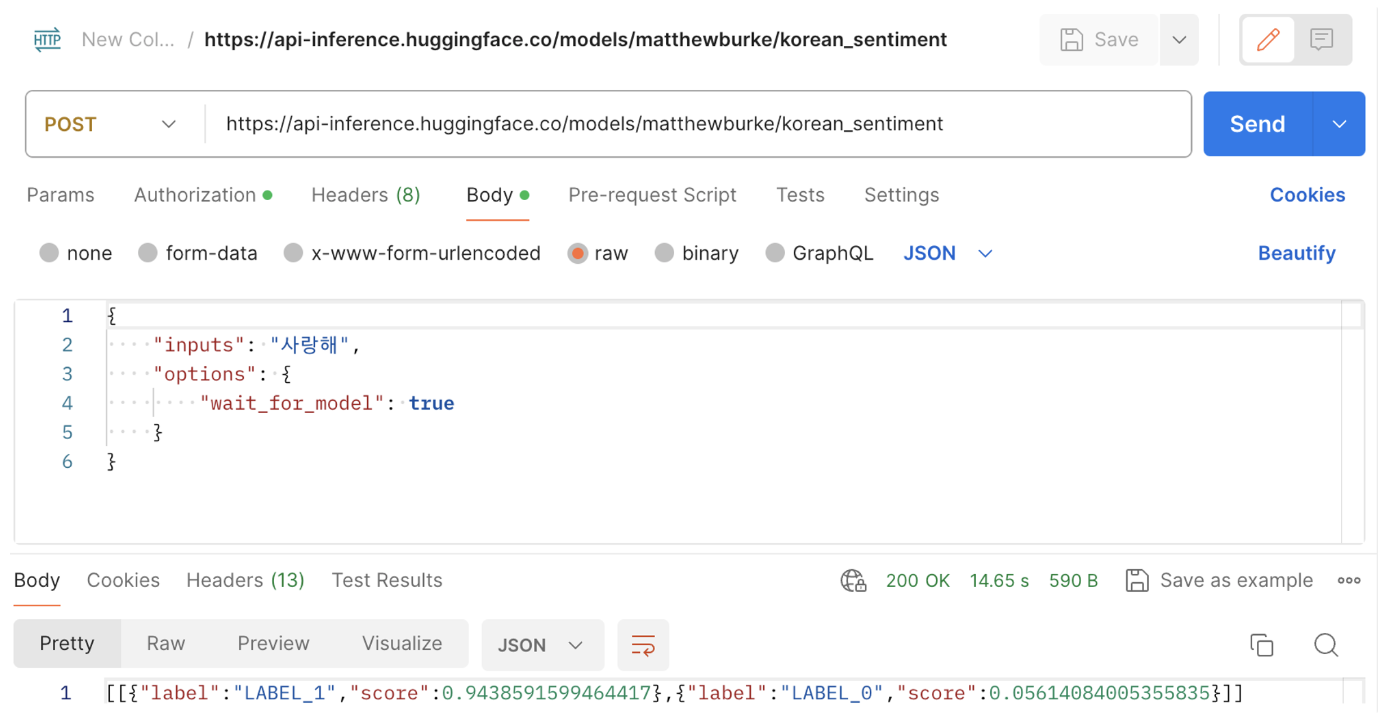
LABEL_0: 부정 지수LABEL_1: 긍정 지수label은LABEL_1와LABEL_0이 있으며 이들의 합은1
🥔 만들기
1. 뼈대 만들기
Step A. index.html에서 뼈대 만들기
<!DOCTYPE html>
<html lang="ko">
  <head>
    <meta charset="UTF-8" />
    <meta name="viewport" content="width=device-width, initial-scale=1.0" />
    <script src="https://cdnjs.cloudflare.com/ajax/libs/p5.js/1.9.0/p5.js"></script>
    <title>감자 키우기</title>
  </head>
  <body>
    <h2>착한 말로 감자 키우기</h2>
    <form id="textForm">
      <input type="text" id="textInput" placeholder="Enter your sentence" />
      <button type="submit">Submit</button>
    </form>
    <div id="result" style="margin: 0.5rem 0">결과:</div>
    <div id="sketch"></div>
    <script src="sketch.js"></script>
  </body>
</html>
Q.
<div id="sketch"></div>는 왜 넣었나요?
A. p5.js가 돌아갈 스케치의 위치를 잡기 위해 만들었습니다.
Q. html 속 요소 마다 id를 붙인 이유가 궁금합니다.
A. JavaScript 사용할 때 특정 요소를 쉽게 찾아가고 조작해야 하는데, id 속성은 문서 전체에서 유일한 식별자를 제공하기 때문입니다.
2. JavaScript를 사용한 API 호출로 문장의 긍정/부정 판단
Step A. script.js 파일 생성 & index.html에 import
/index.html
<!DOCTYPE html>
<html lang="ko">
  <head>
    <meta charset="UTF-8" />
    <meta name="viewport" content="width=device-width, initial-scale=1.0" />
    <script src="https://cdnjs.cloudflare.com/ajax/libs/p5.js/1.9.0/p5.js"></script>
    <title>감자 키우기</title>
  </head>
  <body>
    <h2>착한 말로 감자 키우기</h2>
    <form id="textForm">
      <input type="text" id="textInput" placeholder="Enter your sentence" />
      <button type="submit">Submit</button>
    </form>
    <div id="result" style="margin: 0.5rem 0">결과:</div>
    <div id="sketch"></div>
    <script src="sketch.js"></script>
    <script src="script.js"></script>
  </body>
</html>Step B. 입력 버튼 눌렀을 때 콘솔에 호출하도록 꾸리기
/script.js
const textForm = document.getElementById('textForm');
const textInput = document.getElementById('textInput');

textForm.onsubmit = function (event) {
  event.preventDefault();
  const text = textInput.value;

  console.log("input text:", text)
};document.getElementById(’textForm’):id가textForm인 요소를 찾는다.textForm.onsubmit:textForm이라는 폼 요소에 제출(submit) 이벤트가 발생했을 때 실행될 함수를 정의. 사용자가 폼을 제출하려고 할 때, 이 함수가 호출됩니다.textInput.value: 사용자가 입력한 값을 읽어올 때 사용하는 방법입니다.
event.preventDefault()? 폼 제출 시, 웹 페이지가 새로고침 되거나 서버로 데이터가 전송되는 것을 방지하는 역할을 합니다.
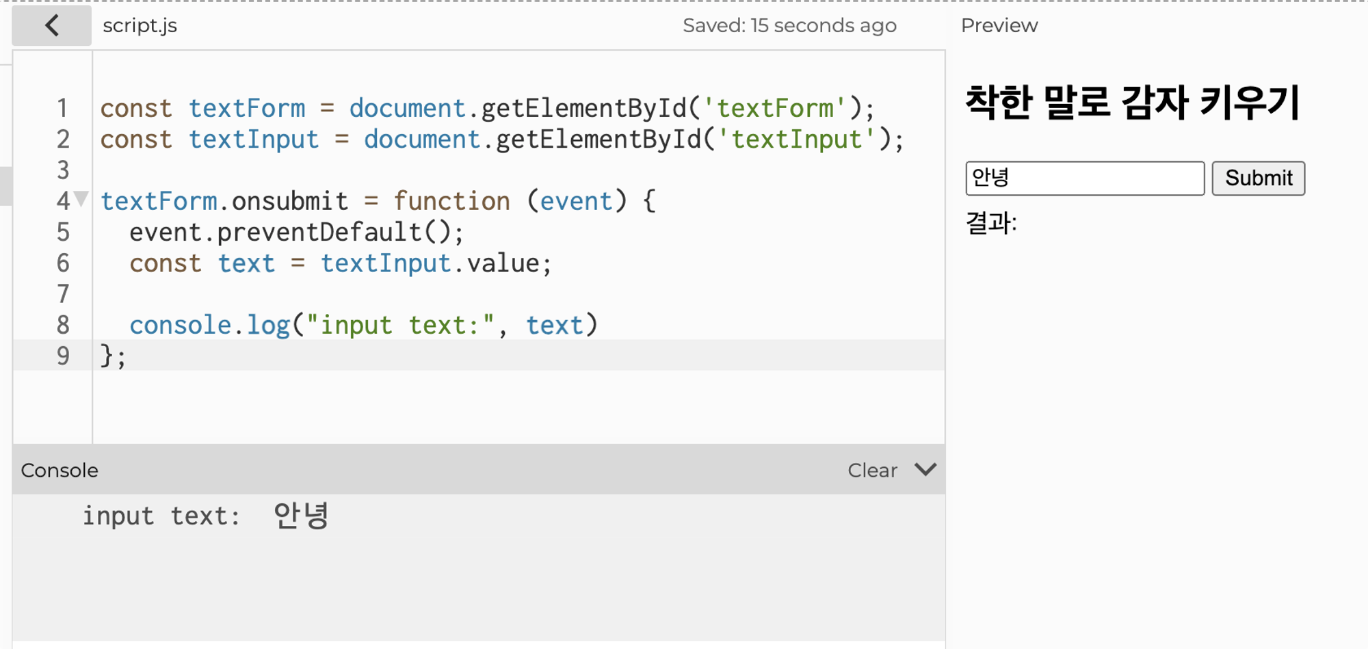
/script.js
const textForm = document.getElementById('textForm');
const textInput = document.getElementById('textInput');

textForm.onsubmit = function (event) {
  event.preventDefault();
  const text = textInput.value;

  console.log("input text:", text)
  textInput.value = '';
};Step C. Hugging Face Inference API를 호출한다. 그리고 호출 결과는 콘솔에 호출
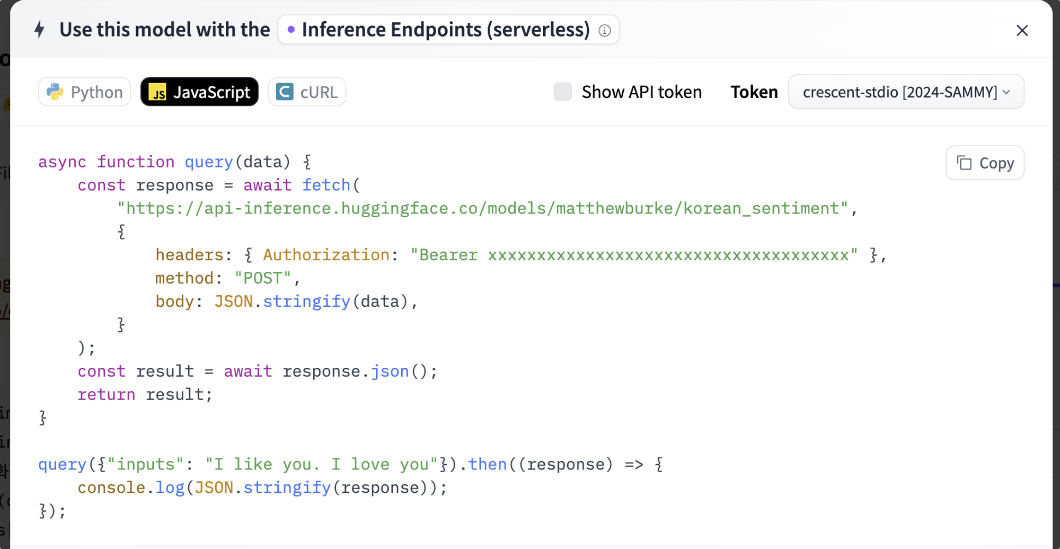
- 예시는 다음에서 확인할 수 있다.
/script.js
HUGGINGFACE_API_TOKEN = "INPUT_YOUR_API_TOKEN"

const textForm = document.getElementById("textForm");
const textInput = document.getElementById("textInput");

textForm.onsubmit = function (event) {
  event.preventDefault();
  const text = textInput.value;

  query({ inputs: text, options: { wait_for_model: true } }).then(
    (response) => {
      console.log(text, JSON.stringify(response));
    }
  ).catch((error) => console.error(error));

  textInput.value = "";
};

async function query(data) {
  try {
    const response = await fetch(
      "https://api-inference.huggingface.co/models/matthewburke/korean_sentiment",
      {
        headers: { Authorization: `Bearer ${HUGGINGFACE_API_TOKEN}` },
        method: "POST",
        body: JSON.stringify(data),
      }
    );

    if (!response.ok)
      throw new Error(`[${response.status}] 서버에서 응답을 받지 못했습니다.`);

    return await response.json();
  } catch (error) {
    throw error;
  }
}🤔
async?await? → 쉬운 비동기를 위한 문법
async: 함수 앞에 붙여주면, 함수 내부에서await를 사용할 수 있게 된다.await fetch:fetch가 끝날 때까지 끝내주게 기다리기(= 동기화하기 위함) 단, 감싸는 함수에async붙여야 함 (c.f mdn web docs: async function)
🤔
try...catch문: 코드 실행 중 발생할 수 있는 오류를 처리
- ∴ try 블록에서 코드를 실행 → 오류 가 발생하면 catch 블록에서 그 오류를 처리
🤔
throw: 오류 위로(상위 함수로) 집어 던지기
🤔 Promise 객체 query의
.then()/.catch()메소드?
.then(): 비동기(e.g)async await) 작업이 성공적으로 완료되었을 때 실행할 부분- ∴
async를 가지고 있거나 하는Promise타입이 함수 실행이 성공하면 실행하는 부분.
- ∴
.catch(): 비동기 작업이 실패 했을 때 실행하는 부분


3. 결과를 HTML에 표시한다. (JavaScript)
Stap A. 결과를 정제하는 함수 handleSentimentResponse() 구현
/script.js
HUGGINGFACE_API_TOKEN = "INPUT_YOUR_API_TOKEN"

const LABEL_POSITIVE = 'LABEL_1';
const textForm = document.getElementById("textForm");
const textInput = document.getElementById("textInput");

textForm.onsubmit = function (event) {
  event.preventDefault();
  const text = textInput.value;

  query({ inputs: text, options: { wait_for_model: true } })
    .then((response) => handleSentimentResponse(response, text))
    .catch((error) => console.error(error));
  textInput.value = "";
};

// ...

function handleSentimentResponse(response, text) {
  const positiveScore = response[0].find(
    (item) => item.label === LABEL_POSITIVE
  ).score;
  const negativeScore = 1 - positiveScore;
  const isPositive = positiveScore > negativeScore;

  console.log("text", text);
  console.log("response", response);
  console.log("positiveScore", positiveScore);
  console.log("negativeScore", negativeScore);
  console.log("isPositive", isPositive);
}결과(response)는 Array로 되어있으며, label로 구분되어 있다.

label의 순서는 충분히 달라질 수 있기 때문에LABEL_POSITIVE(=LABEL_1)인 것을 찾아 그score값을positiveScore라고 칭했다.- 긍정(
LABEL_1)과 부정(LABEL_0)의 정도의 합은 1임을 이용해negativeScore를 계산
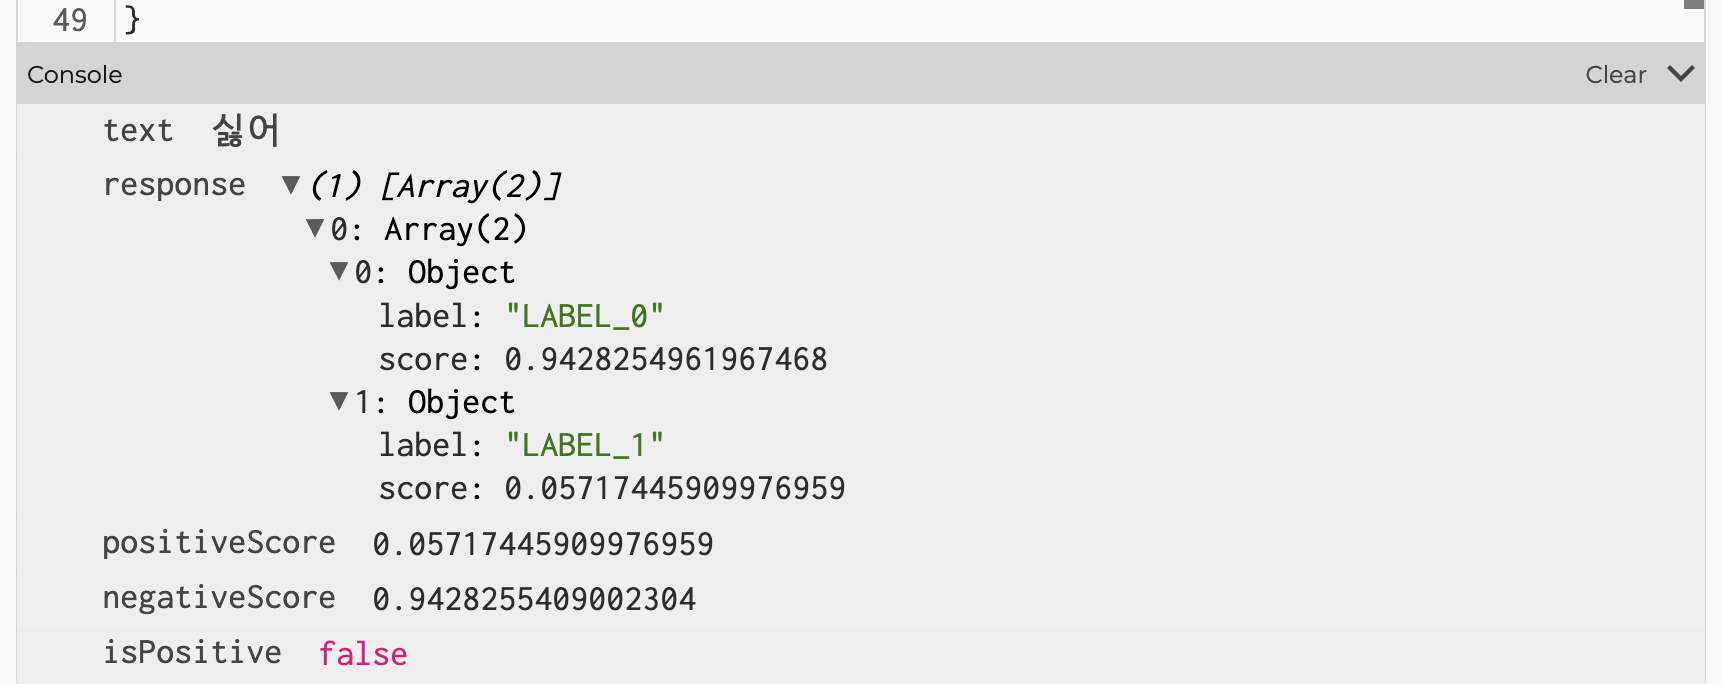
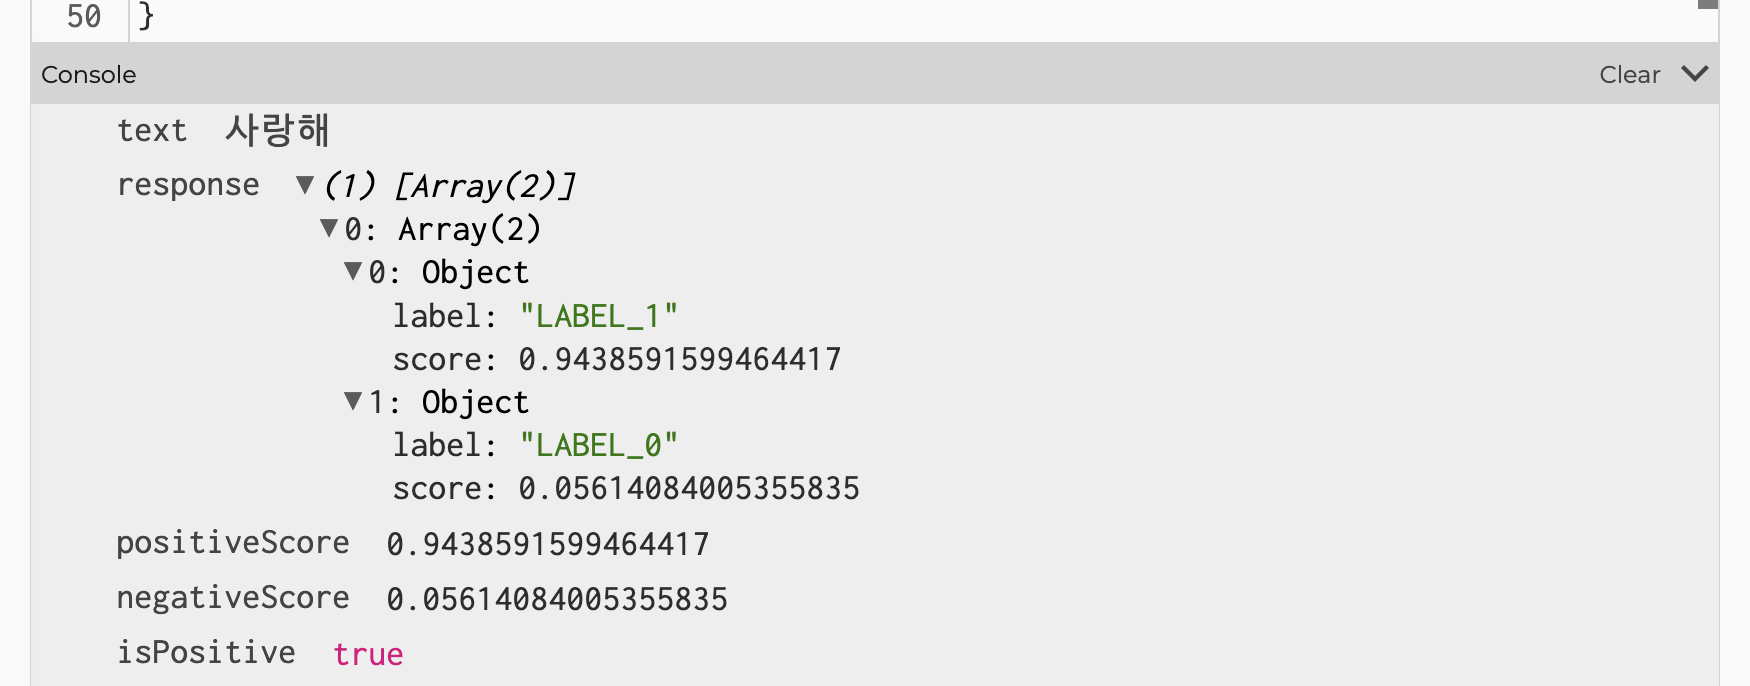
🥰
console.log()디버깅용 출력이기 때문에 실제로 선보일 때는 지우시는 것이 좋습니다.
Step B. updateUI()를 통해 HTML로 표시하기
/script.js
HUGGINGFACE_API_TOKEN = "INPUT_YOUR_API_TOKEN"

const LABEL_POSITIVE = "LABEL_1";
const textForm = document.getElementById("textForm");
const textInput = document.getElementById("textInput");
const resultElement = document.getElementById("result");

// ...

function handleSentimentResponse(response, text) {
  const positiveScore = response[0].find(
    (item) => item.label === LABEL_POSITIVE
  ).score;
  const negativeScore = 1 - positiveScore;
  const isPositive = positiveScore > negativeScore;

  updateUI(text, isPositive, isPositive ? positiveScore : negativeScore);
}

function updateUI(text, isPositive, score) {
  const emotion = isPositive ? "긍정" : "부정";
  resultElement.innerText = `[${text}] ${emotion}: ${score}`;
  resultElement.style.color = isPositive ? "green" : "red";
}
- 입력한 단어와 함께
- 긍정인지 부정인지 표시
- 얼마나 정도가 심한지 표시
/index.html
<!DOCTYPE html>
<html lang="ko">
  <head>
    <meta charset="UTF-8" />
    <meta name="viewport" content="width=device-width, initial-scale=1.0" />
    <script src="https://cdnjs.cloudflare.com/ajax/libs/p5.js/1.9.0/p5.js"></script>
    <title>감자 키우기</title>
  </head>
  <body>
    <h2>착한 말로 감자 키우기</h2>
    <form id="textForm">
      <input type="text" id="textInput" placeholder="Enter your sentence" />
      <button type="submit">Submit</button>
    </form>
    <div id="result" style="margin: 0.5rem 0">결과:</div>
    <div id="sketch"></div>
    <script src="sketch.js"></script>
    <script src="script.js"></script>
  </body>
</html>document.getElementById()를 이용해 결과를 표시할Element를 찾은 후.innerText를 설정해 표시되는text{js}를 변경 (c.f. HTMLElement.innerText)
.style.color를 설정해 글자의 색을 변경(c.f. HTMLElement: style property)
4. 긍정이면 잎이 자라고 배경이 초록색으로 바뀐다. 그리고 부정이면 잎이 줄어들고 배경이 분홍색으로 바뀐다. (p5.js)
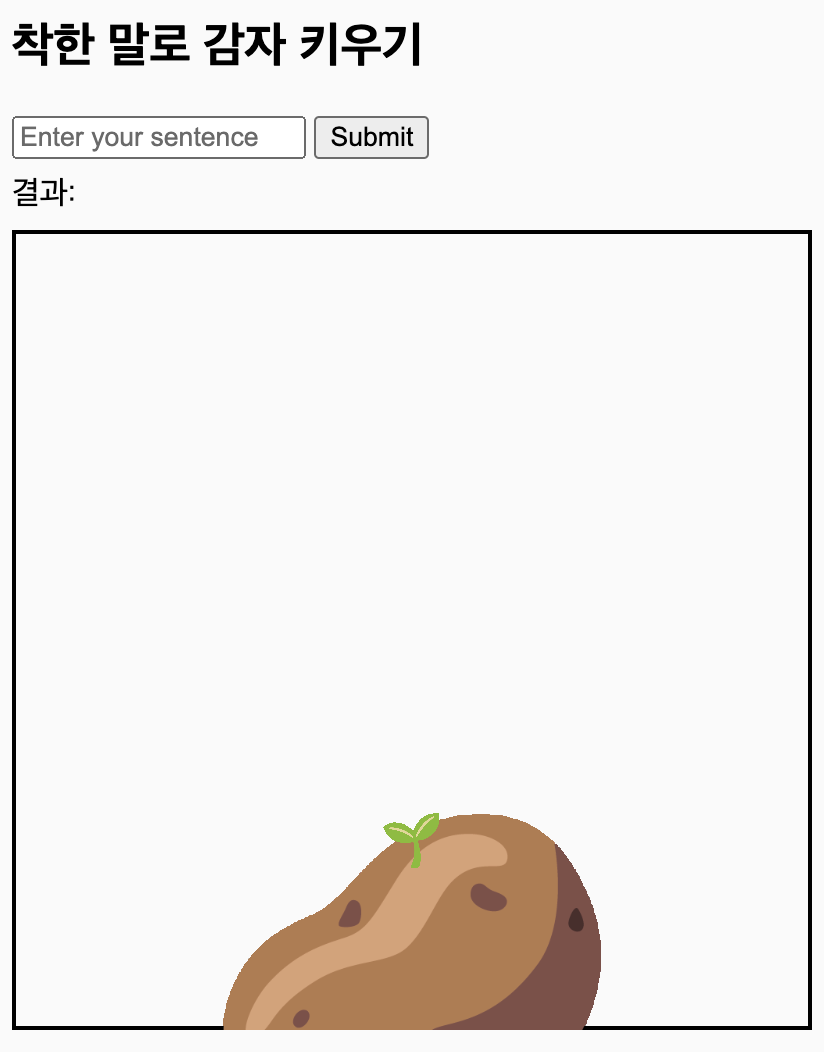
Step A. 감자와 싹 그리기
/sketch.js
let seedlingSize = 30;

const sketch = (p) => {
  let potatoImg, seedlingImg;

  p.preload = () => {
    potatoImg = p.loadImage("potato.png");
    seedlingImg = p.loadImage("seedling.png");
  };

  p.setup = () => {
    // id가 sketch인 div에 캔버스를 생성
    p.createCanvas(400, 400).parent('sketch');
    p.imageMode(p.CENTER);
  };

  p.draw = () => {
    // 배경에 테두리
    p.noFill();
    p.strokeWeight(4);
    p.rect(0, 0, 400, 400);

    // 감자와 새싹 그리기
    p.image(potatoImg, 200, 380, 200, 200);
    p.image(seedlingImg, 200, 320 - seedlingSize / 2, seedlingSize, seedlingSize);
  };
};

sketchp5 = new p5(sketch);⚠︎ 이미지 업로드 후 진행 부탁드립니다!
🤔 new p5(sketch)
- 함수 sketch로 정의된 스케치를 기반으로 p5 인스턴스를 생성.
- ∴ 인스턴스가 생경되면서 preload, setup, draw 메소드가 순서대로 실행된다.
- (c.f. p5,js instantiation)
Q. 왜 하나요?
- A. 다른 JS코드(script.js)에서 뒤에 구현한 함수를 호출하기 위해
Step B. 원하는 바를 이루기
/script.js
let bgColor;
let seedlingSize = 30;
const GROWTH_SIZE = 40;

const sketch = (p) => {
  let potatoImg, seedlingImg;

  p.preload = () => {
    potatoImg = p.loadImage("potato.png");
    seedlingImg = p.loadImage("seedling.png");
  };

  p.setup = () => {
    // id가 sketch인 div에 캔버스를 생성
    p.createCanvas(400, 400).parent('sketch');
    bgColor = p.color("#ffffff");
    p.imageMode(p.CENTER);
  };

  p.draw = () => {
    p.background(bgColor);

    // 배경에 테두리
    p.noFill();
    p.strokeWeight(4);
    p.rect(0, 0, 400, 400);

    // 감자와 새싹 그리기
    p.image(potatoImg, 200, 380, 200, 200);
    p.image(seedlingImg, 200, 320 - seedlingSize / 2, seedlingSize, seedlingSize);
  };

  // this function is called from `script.js`
  p.changePotato = (isPositive, score) => {
    if (isPositive) {
      bgColor = p.color("#03ac13");
      seedlingSize += GROWTH_SIZE;
    } else {
      bgColor = p.color("#ffe1d5");
      seedlingSize = Math.max(30, seedlingSize - GROWTH_SIZE);
    }
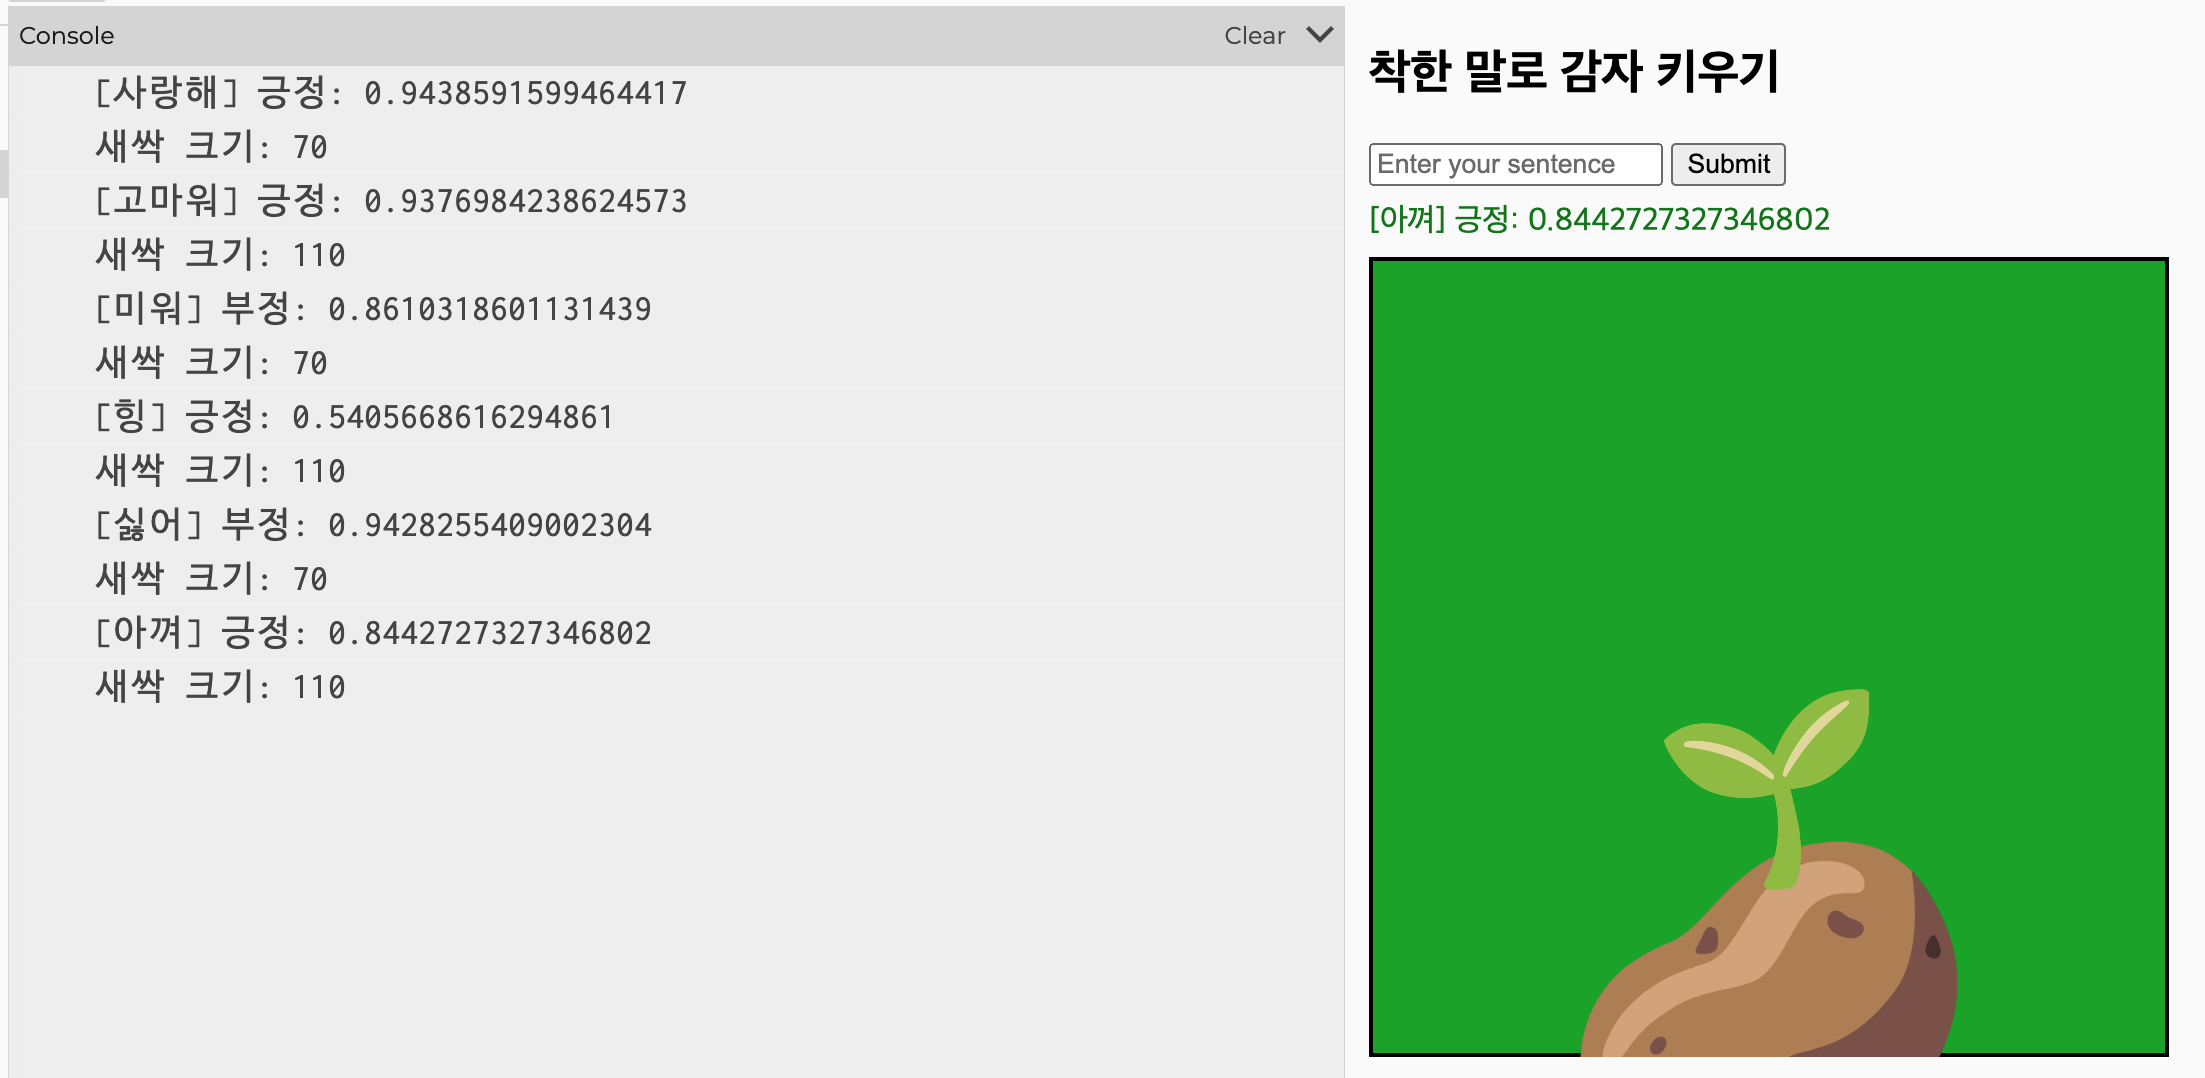
    console.log(`${isPositive ? "긍정" : "부정"} 새싹 크기:, ${seedlingSize}`);

    p.redraw();
  };
};

sketchp5 = new p5(sketch);/script.js
function updateUI(text, isPositive, score) {
  const emotion = isPositive ? "긍정" : "부정";
  resultElement.innerText = `[${text}] ${emotion}: ${score}`;
  resultElement.style.color = isPositive ? "green" : "red";

  console.log(resultElement.innerText)
  sketchp5.changePotato(text, isPositive, score);
}
🔥 Appendix. 다이나믹하게 즐기기
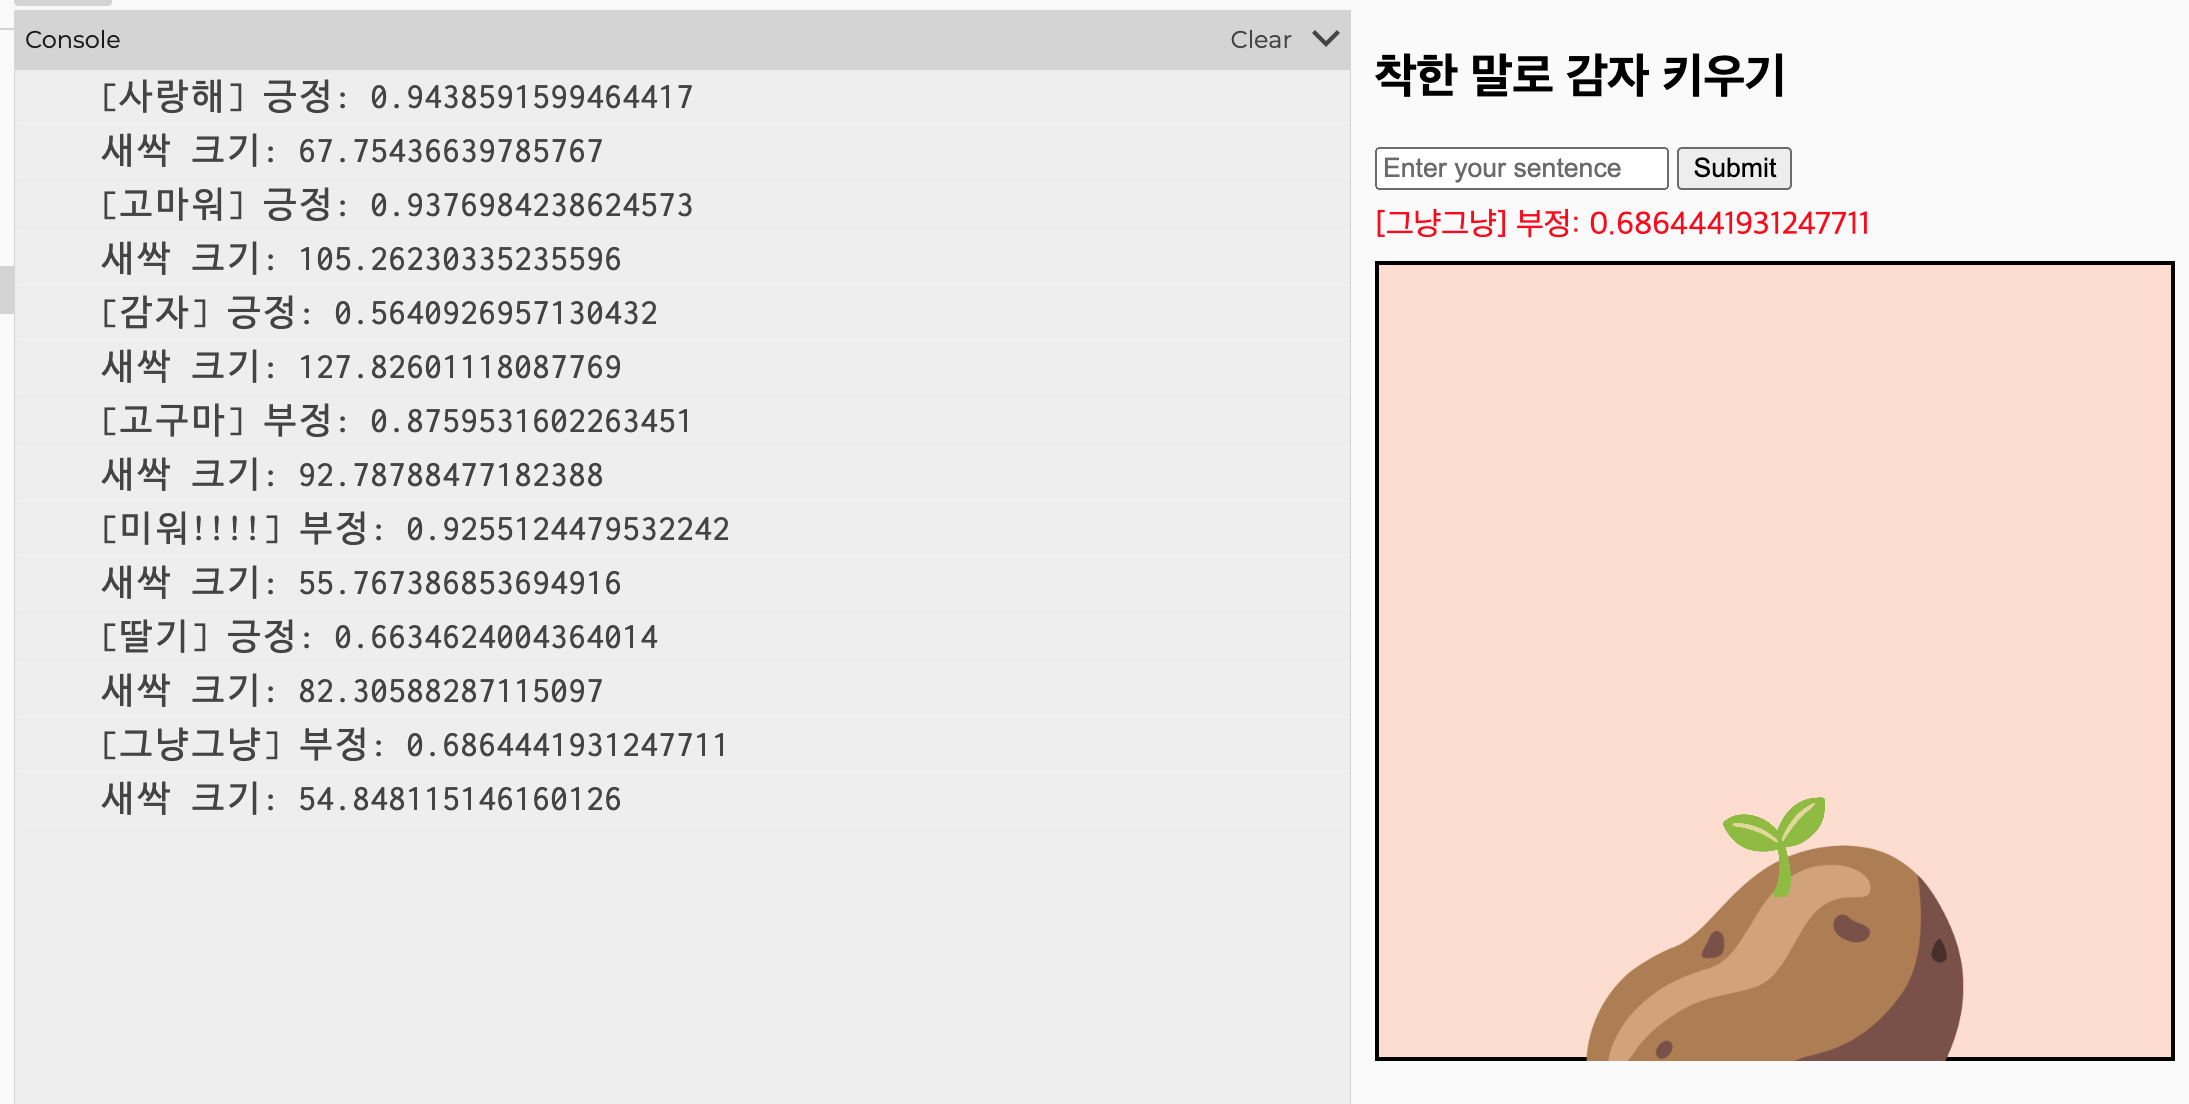
A. 크기의 변화시키는 변수를 늘리기
/script.js
const sketch = (p) => {
  // this function is called from `script.js`
  p.changePotato = (text, isPositive, score) => {
    if (isPositive) {
      bgColor = p.color("#03ac13");
      seedlingSize += GROWTH_SIZE * score;
    } else {
      bgColor = p.color("#ffe1d5");
      seedlingSize = Math.max(30, seedlingSize - GROWTH_SIZE * score);
    }
    console.log(`새싹 크기: ${seedlingSize}`);

    p.redraw();
  };
};

sketchp5 = new p5(sketch);B. 배경 색을 바꾸기
C. 감자가 아닌 다른 요소를?
🥳 마치며
- 이번 글에서는 p5.js와 Hugging Face Inference API를 이용해 감자 키우기 게임을 만들어보았다.
- 감자가 싹이나면 배경색이 바뀌고, 긍정적인 단어를 입력하면 싹이 자라고 부정적인 단어를 입력하면 싹이 줄어드는 것을 확인할 수 있다.
- 이를 통해, Hugging Face Inference API를 이용해 긍정/부정을 판단하고, 그 결과를 p5.js로 시각화하는 방법을 배웠다.
- Hugging Face Inference API를 이용하면, 감자 키우기 게임 외에도 다양한 프로젝트를 할 수 있을 것이다!!!!!!!!
만들다 생각난건데 감자에 싹이나면 독성을 띄는 감자가 될텐데 이러면 뭔가 이상하다🤔
 Crescent